Last Updated on March 6, 2023
If you’re the owner of a Chevy truck, then at some point, you’ll need to know how to adjust clutch on chevy truck. The process is actually quite easy and can be done in just a few minutes with the right tools. This article will walk you through the steps involved in adjusting your Chevy truck’s clutch.
Why Should You Learn How to Adjust Your Clutch?
There are a few reasons why you should learn to adjust your clutch. Here are some of them:
- If you know how to adjust your clutch, then you won’t have to pay a professional mechanic to do it for you. This can save you a lot of money in the long run.
- By learning how to adjust your clutch properly, you can help prevent any problems that may occur with it in the future.
- If you adjust your clutch correctly, it will last longer and perform better.
So, now that you know why you should learn how to adjust your clutch let’s look at how to do it.
How to Adjust Clutch on Chevy Truck: Step-by-Step Guide?
Before you begin, you’ll need to gather a few tools:
- A ratchet
- A socket that fits the nut on the clutch pedal
- A small screwdriver
- A big flathead screwdriver
Now that you have the necessary tools, let’s adjust your clutch.
1. Park Your Truck on a Level:
The first step is to park your truck on a level surface. This will make it easier to adjust the clutch and prevent the car from rolling while you’re working on it.
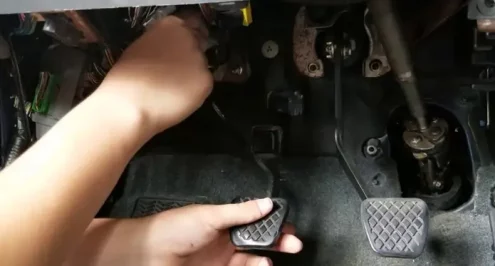
2. Disengage the Clutch:
The next step is to disengage the clutch. To do this, press down on the clutch pedal and hold it in that position. Most trucks have a spring-loaded mechanism that will keep the pedal in place, but you may need to use your hand to hold it down if there isn’t one.
3. Adjust the Clutch Pedal:
Once the clutch is disengaged, you can begin adjusting the pedal. To do this, loosen the nut on the back of the pedal using the ratchet and socket.
Next, use the small screwdriver to turn the adjusting screw until the pedal is at the height that you want it to be. Once you have the pedal where you want it, tighten the nut back down and make sure that the pedal doesn’t move.
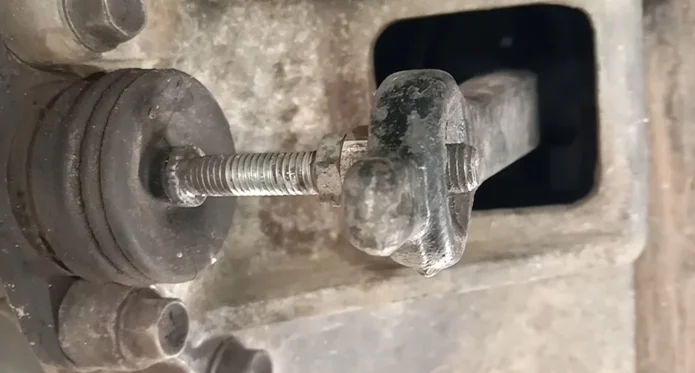
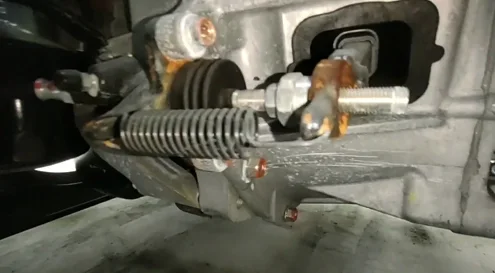
4. Adjust the Clutch Cable:
Now it’s time to adjust the clutch cable. Loosen the bolt on the bracket that holds the line in place using the ratchet and socket.
Then, use the big flathead screwdriver to loosen the adjusting nut on the cable. Once it’s loose, turn it until the cable is adjusted to the correct length. Tighten the nut back down and re-tighten the bolt on the bracket.
5. Engage the Clutch:
Now that you’ve adjusted the clutch, it’s time to test it out. To do this, press down on the clutch pedal and release it. If the pedal feels stiff or hard to push down, you’ll need to adjust it. Keep changing it until the pedal feels smooth and easy to push down.
6. Test the Clutch:
Once the pedal feels smooth, it’s time to test the clutch. Start the truck and put it in gear. Slowly release the clutch pedal until the car starts moving. If the car moves too slowly or jerks when you remove the pedal, you’ll need to adjust it. Keep changing it until the truck moves smoothly.
7. Repeat the Process:
If you need to adjust the clutch again, repeat the steps above. After a few tries, you should be able to get it adjusted correctly.
That’s all there is to it! By following these steps, you should be able to adjust the clutch on your Chevy truck easily.
What Mistakes to Avoid When Adjusting Clutch on Chevy Truck?
You’ll want to avoid a few mistakes when adjusting your clutch. Here are some of them:
- Don’t adjust the pedal too high or too low. The pedal should be at a comfortable height that you can reach without strain.
- Be careful not to overtighten the cable. If the cable is too tight, it will damage the cable and make it difficult to adjust.
- Don’t over-tighten the bolts and nuts on the clutch components. This can cause damage and make it difficult to adjust them in the future.
- The clutch pedal should not be forced down if it feels stiff or hard to push. This can damage the clutch and the pedal mechanism.
- Don’t drive the truck until the clutch is fully adjusted. This can cause damage to the clutch and the transmission.
- While the truck is moving, do not try to adjust the clutch while it is moving. This can be dangerous and damage the clutch.
By avoiding these mistakes, you’ll be able to adjust your Chevy truck’s clutch without any problems appropriately.
FAQs
Q: What Should I Do If The Clutch Pedal Feels Stiff Or Rigid to Push Down?
A: If the pedal feels stiff or rigid to push down, you’ll need to adjust it. Keep changing it until the pedal feels smooth and easy to push down.
Q: What Should I Do If The Truck Moves Too Slowly or Jerks When Releasing The Pedal?
A: If the truck moves too slowly or jerks when you release the pedal, you’ll need to adjust it. Keep changing it until the car drives smoothly.
Q: How Often Should I Adjust The Clutch on My Chevy Truck?
A: You should adjust the clutch whenever it feels stiff or hard to push down. Additionally, you should check the adjustment period to ensure that it hasn’t changed.
Conclusion
Knowing how to adjust your own Chevy truck’s clutch is a valuable skill that can save you money in the long run. It is easy to do, but it also allows you to prevent any problems with the clutch and increase its life span. Additionally, adjusting the clutch can improve gas mileage and overall performance. So if you’re having trouble with your truck’s clutch, follow the steps above and adjust it accordingly. Thanks for reading!
